Local Notification in Flutter using awesome_notifications
Beginner's guide to Local Notifications in Flutter


Mobile applications often need to communicate important information to users, even when the app is not actively running. Local notifications are a crucial feature for achieving this, as they allow developers to display messages, reminders, or alerts directly on the user's device.
In this article, we'll explore the implementation of local notifications in a Flutter application using the awesome_notifications package. We'll cover the reasons for using local notifications, their importance in applications, and provide a step-by-step guide on creating, scheduling, and canceling notifications. Additionally, we'll walk through the setup of a Flutter project and the necessary dependencies.
Why Local Notifications?
Local notifications play a vital role in enhancing user engagement and providing a seamless user experience. Here are some key reasons for incorporating local notifications in your Flutter application:
User Engagement: Notifications help keep users engaged with your app by providing timely and relevant information, updates, or reminders.
Retaining User Attention: In a crowded app landscape, notifications serve as a means to capture and retain user attention, ensuring they don't forget about your app.
Enhanced User Experience: Local notifications can enhance the overall user experience by providing real-time updates, alerts, or personalized messages.
Task Reminders: Applications often need to remind users about specific tasks, events, or deadlines. Local notifications are an effective way to alert users about such events.
Project Example
Setting Up the Flutter Project
In this project, we are going to be a Flutter application for iOS and Android that incorporates local notifications, scheduling of notifications, canceling of notifications, reducing the notification count on iOS, and triggering of actions when a notification is opened and other functionalities.
Let's start by creating a Flutter project and adding the necessary dependencies for local notifications. Follow the steps below:
Create a new Flutter project using the following commands:
flutter create app_notifications
cd app_notifications
Open the pubspec.yaml file and add the following dependencies:
dependencies:
  flutter_launcher_icons: ^0.13.1
  awesome_notifications: ^0.9.2
  cool_alert: ^2.0.1
  awesome_notifications_core: ^0.9.1
Configure flutter_launcher_icons by adding the following code below the dev_dependencies section in the pubspec.yaml file:
flutter_icons:
  android: "launcher_icon"
  ios: true
  remove_alpha_ios: true
  image_path: "assets/imgs/icon.png"
  adaptive_icon_background: "#6C63FF"
  adaptive_icon_foreground: "assets/imgs/icon.png"
Add this to pubspec.yaml file too:
assets:
    - assets/imgs/
Create a folder named assets and another folder inside it named imgs. Place images named icon.png, cancel.png, eco.png, eco_large.png, network.png, res_notification_icon.png, rocket.png, stats.png in the imgs folder.
Run the following commands to apply the changes:
flutter pub get
flutter pub run flutter_launcher_icons
Inside your lib directory, create a folder named constants. Inside this folder, create a file named app_strings.dart and add the following code:
class AppStrings {
  static const String BASIC_CHANNEL_KEY = 'basic_channel';
  static const String BASIC_CHANNEL_NAME = 'Basic Notifications';
  static const String BASIC_CHANNEL_DESCRIPTION = 'This channel is for basic notification';

  static const String SCHEDULE_CHANNEL_KEY = 'schedule_channel';
  static const String SCHEDULE_CHANNEL_NAME = 'Schedule Notifications';
  static const String SCHEDULE_CHANNEL_DESCRIPTION = 'This channel is for schedule notification';

  static const String DEFAULT_ICON = 'asset://assets/imgs/icon.png';

  static const String SCHEDULED_NOTIFICATION_BUTTON1_KEY = 'button_one';
  static const String SCHEDULED_NOTIFICATION_BUTTON2_KEY = 'button_two';
}
This file contains constants used throughout the application, such as channel keys, names, and descriptions.
Inside the constants folder, create a file named colors.dart and add the following code:
import 'dart:ui';

class AppColor {
  static const primaryColor = Color(0XFF6C63FF);
  static const secondaryColor = Color(0XFFF96685);
}
This file defines color constants that can be used for consistent theming in the application.
Create a folder inside lib called utilities. Inside this folder, create a file named notification_util.dart and add the following code:
import 'dart:io';
import 'package:app_notifications/utilities/create_uid.dart';
import 'package:awesome_notifications/awesome_notifications.dart';
import 'package:flutter/material.dart';
import '../constants/app_strings.dart';
import '../constants/colors.dart';
import '../main.dart';
import '../pages/stats_page.dart';

class NotificationUtil {
  final AwesomeNotifications awesomeNotifications;

  NotificationUtil({required this.awesomeNotifications});

  // Create Basic Notification
  Future<void> createBasicNotification({
    required int id,
    required String channelKey,
    required String title,
    required String body,
    String bigPicture = AppStrings.DEFAULT_ICON,
    NotificationLayout layout = NotificationLayout.BigPicture,
  }) async {
    awesomeNotifications.createNotification(
      content: NotificationContent(
        id: id,
        channelKey: channelKey,
        title: title,
        body: body,
        bigPicture: bigPicture,
        notificationLayout: layout,
      ),
    );
  }

  // Create Schedule Notification
  Future<void> createScheduledNotification({
    required int id,
    required String channelKey,
    required String title,
    required String body,
    String bigPicture = AppStrings.DEFAULT_ICON,
    NotificationLayout layout = NotificationLayout.BigPicture,
    required NotificationCalendar notificationCalendar,
  }) async {
    awesomeNotifications.createNotification(
      content: NotificationContent(
        id: id,
        channelKey: channelKey,
        title: title,
        body: body,
        bigPicture: bigPicture,
        notificationLayout: layout,
      ),
      actionButtons: [
        NotificationActionButton(
          key: AppStrings.SCHEDULED_NOTIFICATION_BUTTON1_KEY,
          label: 'Mark Done',
        ),
        NotificationActionButton(
          key: AppStrings.SCHEDULED_NOTIFICATION_BUTTON2_KEY,
          label: 'Clear',
        ),
      ],
      schedule: NotificationCalendar(
        weekday: notificationCalendar.weekday,
        hour: notificationCalendar.hour,
        minute: notificationCalendar.minute,
        repeats: true,
      ),
    );
  }

  // cancel all scheduled notifications
  void cancelAllScheduledNotifications({required BuildContext context}){
    awesomeNotifications.cancelAllSchedules().then((value) => {
      ScaffoldMessenger.of(context).showSnackBar(
        const SnackBar(
          content: Text('Cancelled all scheduled notifications'),
          backgroundColor: AppColor.primaryColor,
        ),
      )
    });
  }

  // requestPermissionToSendNotifications
  void requestPermissionToSendNotifications({required BuildContext context}) {
    AwesomeNotifications().requestPermissionToSendNotifications().then((value) {
      Navigator.of(context).pop();
    });
  }

  // listener actions
  /// Use this method to detect when a new notification or a schedule is created
  @pragma("vm:entry-point")
  static Future<void> onNotificationCreatedMethod(
      ReceivedNotification receivedNotification, BuildContext context) async {
    ScaffoldMessenger.of(context).showSnackBar(
      SnackBar(
        content: Text(
          'Notification created ${receivedNotification.channelKey}',

        ),
        backgroundColor: AppColor.primaryColor,
      ),
    );
  }

  /// Use this method to detect every time that a new notification is displayed
  @pragma("vm:entry-point")
  static Future<void> onNotificationDisplayedMethod(
      ReceivedNotification receivedNotification) async {
    // Your code goes here
  }

  /// Use this method to detect if the user dismissed a notification
  @pragma("vm:entry-point")
  static Future<void> onDismissActionReceivedMethod(
      ReceivedAction receivedAction) async {
    // Your code goes here
  }

  /// Use this method to detect when the user taps on a notification or action button
  @pragma("vm:entry-point")
  static Future<void> onActionReceivedMethod(
      ReceivedAction receivedAction) async {


    // reducing icon badge count on iOS
    if (receivedAction.channelKey == AppStrings.BASIC_CHANNEL_KEY &&
        Platform.isIOS) {
      AwesomeNotifications().getGlobalBadgeCounter().then((value) {
        AwesomeNotifications().setGlobalBadgeCounter(value - 1);
      });
    }

    // navigating to stats_page.dart
    MyApp.navigatorKey.currentState?.pushAndRemoveUntil(
        MaterialPageRoute(
          builder: (context) => const StatsPage(),
        ),
        (route) => route.isFirst);
  }
}
This file contains the NotificationUtil class responsible for creating and managing notifications. It also includes methods to handle permission requests and listener actions.
Inside the utilities folder, create a file named create_uid.dart and add the following code:
int createUniqueId() {
  return DateTime.now().millisecondsSinceEpoch.remainder(100000);
}
This file provides a simple method to generate unique IDs for notifications.
Create a folder named components inside lib. Inside this folder, create the following files: custom_alert_dialog.dart, custom_rich_text.dart, custom_elevated_button.dart, stats_container.dart, and k_cool_alert.dart.
Inside custom_alert_dialog.dart, paste the following code:
import 'dart:io';
import 'package:flutter/cupertino.dart';
import 'package:flutter/material.dart';
import '../constants/colors.dart';

Future<void> customAlertDialog({
  required String title,
  required String content,
  required BuildContext context,
  required Function action,
  required String button1Title,
  required String button2Title,
}) {
  return showDialog(
    context: context,
    builder: (context) =>
// FOR iOS
Platform.isIOS
        ? CupertinoAlertDialog(
            title: Text(
              title,
              style: const TextStyle(
                fontWeight: FontWeight.w700,
                color: Colors.black,
                fontSize: 16,
              ),
            ),
            content: Text(content),
            actions: [
              Padding(
                padding: const EdgeInsets.all(8.0),
                child: ElevatedButton(
                  style: ElevatedButton.styleFrom(
                    padding: const EdgeInsets.symmetric(horizontal: 5),
                    backgroundColor: AppColor.secondaryColor,
                    shape: RoundedRectangleBorder(
                      borderRadius: BorderRadius.circular(10),
                    ),
                  ),
                  onPressed: () => action(),
                  child: Text(
                    button1Title,
                    style: const TextStyle(
                      color: Colors.white,
                      fontWeight: FontWeight.normal,
                    ),
                  ),
                ),
              ),
              Padding(
                padding: const EdgeInsets.all(8.0),
                child: ElevatedButton(
                  style: ElevatedButton.styleFrom(
                    padding: const EdgeInsets.symmetric(horizontal: 5),
                    backgroundColor: AppColor.secondaryColor,
                    shape: RoundedRectangleBorder(
                      borderRadius: BorderRadius.circular(10),
                    ),
                  ),
                  onPressed: () => Navigator.of(context).pop(),
                  child: Text(
                    button2Title,
                    style: const TextStyle(
                      color: Colors.white,
                      fontWeight: FontWeight.normal,
                    ),
                  ),
                ),
              ),
            ],
          )
        // FOR Android
        : AlertDialog(
            title: Text(
              title,
              style: const TextStyle(
                fontWeight: FontWeight.w700,
                color: Colors.black,
                fontSize: 16,
              ),
            ),
            content: Text(content),
            actions: [
              ElevatedButton(
                style: ElevatedButton.styleFrom(
                  backgroundColor: AppColor.secondaryColor,
                  padding: const EdgeInsets.symmetric(horizontal: 5),
                  shape: RoundedRectangleBorder(
                    borderRadius: BorderRadius.circular(10),
                  ),
                ),
                onPressed: () => action(),
                child: Text(
                  button1Title,
                  style: const TextStyle(
                    color: Colors.white,
                    fontWeight: FontWeight.normal,
                  ),
                ),
              ),
              ElevatedButton(
                style: ElevatedButton.styleFrom(
                  backgroundColor: AppColor.secondaryColor,
                  padding: const EdgeInsets.symmetric(horizontal: 5),
                  shape: RoundedRectangleBorder(
                    borderRadius: BorderRadius.circular(10),
                  ),
                ),
                onPressed: () => Navigator.of(context).pop(),
                child: Text(
                  button2Title,
                  style: const TextStyle(
                    color: Colors.white,
                    fontWeight: FontWeight.normal,
                  ),
                ),
              ),
            ],
          ),
  );
}
This file defines a customizable alert dialog for displaying messages and actions to the user for iOS and Android
Inside custom_rich_text.dart, paste the following code:
import 'package:flutter/material.dart';

class CustomRichText extends StatelessWidget {
  const CustomRichText({
    Key? key,
    required this.title,
    required this.content,
  }) : super(key: key);

  final String title;
  final String content;

  @override
  Widget build(BuildContext context) {
    return RichText(
      text: TextSpan(
        text: title,
        style: TextStyle(
          color: Colors.grey.shade800,
          fontWeight: FontWeight.w800,
        ),
        children: [
          TextSpan(
            text: content,
            style: const TextStyle(
              color: Colors.grey,
            ),
          ),
        ],
      ),
    );
  }
}
This file defines a custom-rich text widget that combines a title and content in different styles.
Inside custom_elevated_button.dart, paste the following code:
import 'package:flutter/material.dart';
import '../constants/colors.dart';

class CustomElevatedButton extends StatelessWidget {
  const CustomElevatedButton({
    Key? key,
    required this.function,
    required this.title,
    required this.icon,
  }) : super(key: key);

  final Function function;
  final IconData icon;
  final String title;

  @override
  Widget build(BuildContext context) {
    return ElevatedButton.icon(
      style: ElevatedButton.styleFrom(
        backgroundColor: AppColor.secondaryColor,
      ),
      onPressed: () => function(),
      icon: Icon(
        icon,
        color: Colors.white,
      ),
      label: Text(
        title,
        style: const TextStyle(
          color: Colors.white,
        ),
      ),
    );
  }
}
This file defines a custom-elevated button with an icon and title.
Inside k_cool_alert.dart, paste the following code:
import 'package:cool_alert/cool_alert.dart';
import 'package:flutter/material.dart';
import '../constants/colors.dart';

Future kCoolAlert({
  required String message,
  required BuildContext context,
  required CoolAlertType alert,
  bool barrierDismissible = true,
  String confirmBtnText = 'Ok',
}) {
  return CoolAlert.show(
    backgroundColor: AppColor.primaryColor,
    confirmBtnColor: AppColor.secondaryColor,
    context: context,
    type: alert,
    text: message,
    barrierDismissible: barrierDismissible,
    confirmBtnText: confirmBtnText,
  );
}
This file defines a custom alert using the `cool_alert` package.
Inside stats_container.dart, paste the following code:
import 'package:flutter/material.dart';
import '../constants/colors.dart';

class StatsContainer extends StatelessWidget {
  StatsContainer({
    Key? key,
    required this.icon,
    required this.stat,
    this.iconColor = Colors.orange,
  }) : super(key: key);

  Color iconColor;
  final IconData icon;
  final String stat;

  @override
  Widget build(BuildContext context) {
    return Container(
      height: 40,
      width: 110,
      decoration: BoxDecoration(
        borderRadius: BorderRadius.circular(20),
        color: AppColor.secondaryColor,
      ),
      child: Center(
        child: Wrap(
          crossAxisAlignment: WrapCrossAlignment.center,
          spacing: 6,
          children: [
            Icon(
              icon,
              color: iconColor,
            ),
            Text(
              stat,
              style: const TextStyle(
                color: Colors.white,
                fontSize: 18,
                fontWeight: FontWeight.w700,
              ),
            )
          ],
        ),
      ),
    );
  }
}
This file defines a stats container widget with an icon and dummy stats.
Create a new folder inside lib called pages. Inside this folder, create two files: home_page.dart and stats_page.dart.
Inside home_page.dart, paste the following code:
import 'package:app_notifications/pages/stats_page.dart';
import 'package:awesome_notifications/awesome_notifications.dart';
import 'package:flutter/cupertino.dart';
import 'package:flutter/material.dart';
import '../components/custom_elevated_button.dart';
import '../components/custom_alert_dialog.dart';
import '../components/custom_rich_text.dart';
import '../constants/app_strings.dart';
import '../constants/colors.dart';
import '../utilities/create_uid.dart';
import '../utilities/notification_util.dart';

class HomePage extends StatefulWidget {
  const HomePage({Key? key}) : super(key: key);

  @override
  State<HomePage> createState() => _HomePageState();
}

class _HomePageState extends State<HomePage> {
  String selectedNotificationDay = '';
  int selectedDayOfTheWeek = 0;
  TimeOfDay selectedTime = TimeOfDay.now();
  bool isTimeSelected = false;
  late NotificationUtil notificationUtil;

  // list of notification days
  final List<String> notificationDays = [
    'Mon',
    'Tue',
    'Wed',
    'Thur',
    'Fri',
    'Sat',
    'Sun',
  ];

  // function for creating basic notification
  void createBasicNotification() {
    notificationUtil.createBasicNotification(
      id: createUniqueId(),
      channelKey: AppStrings.BASIC_CHANNEL_KEY,
      title: '${Emojis.clothing_backpack + Emojis.transport_air_airplane} Network Call',
      body:
          'Lorem ipsum dolor sit amet consectetur adipisicing elit. Maxime mollitia,molestiae quas vel sint commodi repudiandae consequuntur',
      bigPicture: 'asset://assets/imgs/eco_large.png',
    );
  }

  // trigger cancel scheduled notifications
  void triggerCancelNotification() {
    notificationUtil.cancelAllScheduledNotifications(context: context);
  }

  // trigger schedule notification
  void triggerScheduleNotification() {
    showDialog(
      context: context,
      builder: (context) => AlertDialog(
        title: const Text('Show Notification Every'),
        content: Wrap(
          spacing: 3.0,
          runSpacing: 8.0,
          children: notificationDays
              .asMap()
              .entries
              .map(
                (day) => ElevatedButton(
                  style: ElevatedButton.styleFrom(
                      backgroundColor: AppColor.secondaryColor),
                  onPressed: () {
                    int index = day.key;
                    setState(() {
                      selectedNotificationDay = day.value;
                      selectedDayOfTheWeek = index + 1;
                    });
                    Navigator.of(context).pop();
                    pickTime();
                  },
                  child: Text(
                    day.value,
                    style: const TextStyle(
                      color: Colors.white,
                    ),
                  ),
                ),
              )
              .toList(),
        ),
      ),
    );
  }

  // create schedule notification
  void createScheduleNotification() {
    notificationUtil.createScheduledNotification(
      id: createUniqueId(),
      channelKey: AppStrings.SCHEDULE_CHANNEL_KEY,
      title: '${Emojis.time_alarm_clock} Check your rocket!',
      body:
          'Lorem ipsum dolor sit amet consectetur adipisicing elit. Maxime mollitia,molestiae quas vel sint commodi repudiandae consequuntur',
      layout: NotificationLayout.Default,
      notificationCalendar: NotificationCalendar(
        hour: selectedTime.hour,
        minute: selectedTime.minute,
        weekday: selectedDayOfTheWeek,
      ),
    );
  }

  // time picker
  Future<TimeOfDay?> pickTime() async {
    TimeOfDay? pickedTime = await showTimePicker(
      context: context,
      initialTime: TimeOfDay.now(),
    );

    if (pickedTime != null) {
      setState(() {
        selectedTime = pickedTime;
        isTimeSelected = true;
      });
      createScheduleNotification();
    }
    return null;
  }

  // request permission
  void requestPermission() {
    notificationUtil.requestPermissionToSendNotifications(context: context);
  }

  @override
  void initState() {
    AwesomeNotifications().isNotificationAllowed().then((_) {
      return customAlertDialog(
        title: 'Allow notifications',
        content: 'Rocket App needs access to notifications',
        context: context,
        action: requestPermission,
        button1Title: 'Allow',
        button2Title: 'Don\'t Allow',
      );
    });

    // notification util
    notificationUtil = NotificationUtil(
      awesomeNotifications: AwesomeNotifications(),
    );

    // setting listeners for awesome notification
    AwesomeNotifications().setListeners(
      onNotificationCreatedMethod: (notification) async =>
          NotificationUtil.onNotificationCreatedMethod(notification, context),
      onActionReceivedMethod: NotificationUtil.onActionReceivedMethod,
      onDismissActionReceivedMethod: (ReceivedAction receivedAction) =>
          NotificationUtil.onDismissActionReceivedMethod(receivedAction),
      onNotificationDisplayedMethod: (ReceivedNotification receivedNotification) =>
          NotificationUtil.onNotificationDisplayedMethod(receivedNotification),
    );

    super.initState();
  }

  @override
  void dispose() {
    AwesomeNotifications().dispose();
    super.dispose();
  }

  @override
  Widget build(BuildContext context) {
    return Scaffold(
      appBar: AppBar(
        backgroundColor: AppColor.primaryColor,
        title: const Wrap(
          spacing: 8,
          children: [
            Icon(
              CupertinoIcons.rocket,
              color: Colors.white,
            ),
            Text(
              'Rockets',
              style: TextStyle(
                color: Colors.white,
              ),
            ),
          ],
        ),
        actions: [
          IconButton(
            onPressed: () => Navigator.of(context).push(
              MaterialPageRoute(
                builder: (context) => const StatsPage(),
              ),
            ),
            icon: const Icon(
              CupertinoIcons.chart_bar_square,
              color: Colors.white,
            ),
          )
        ],
      ),
      body: Column(
        mainAxisAlignment: MainAxisAlignment.center,
        children: [
          if (isTimeSelected) ...[
            CustomRichText(
              title: 'Selected Day: ',
              content: selectedNotificationDay,
            ),
            const SizedBox(height: 10),
            CustomRichText(
              title: 'Selected Time: ',
              content: selectedTime.format(context),
            ),
            const SizedBox(height: 10),
          ],
          Image.asset('assets/imgs/rocket.png'),
          const SizedBox(height:

 20),
          CustomElevatedButton(
            function: createBasicNotification,
            title: 'Show Basic Notification',
            icon: Icons.notifications,
          ),
          const SizedBox(height: 20),
          CustomElevatedButton(
            function: triggerScheduleNotification,
            title: 'Schedule Notification',
            icon: Icons.schedule,
          ),
          const SizedBox(height: 20),
          CustomElevatedButton(
            function: triggerCancelNotification,
            title: 'Cancel All Scheduled Notifications',
            icon: Icons.cancel,
          ),
        ],
      ),
    );
  }
}
This file defines the home page where users can trigger basic and scheduled notifications.
- Inside
stats_page.dart, paste the following code:
import 'package:flutter/material.dart';
import '../components/stats_container.dart';
import '../constants/colors.dart';

class StatsPage extends StatelessWidget {
  const StatsPage({Key? key}) : super(key: key);

  @override
  Widget build(BuildContext context) {
    return Scaffold(
      appBar: AppBar(
        backgroundColor: AppColor.primaryColor,
        title: const Wrap(
          spacing: 8,
          children: [
            Icon(
              Icons.analytics,
              color: Colors.white,
            ),
            Text(
              'Stats',
              style: TextStyle(
                color: Colors.white,
              ),
            ),
          ],
        ),
      ),
      body: Center(
        child: Padding(
          padding: const EdgeInsets.symmetric(horizontal: 20),
          child: Column(
            mainAxisAlignment: MainAxisAlignment.center,
            children: [
              const StatsContainer(
                icon: Icons.notifications,
                stat: '10',
              ),
              const SizedBox(height: 20),
              const StatsContainer(
                icon: Icons.schedule,
                stat: '5',
              ),
              const SizedBox(height: 20),
              const StatsContainer(
                icon: Icons.cancel,
                stat: '2',
              ),
            ],
          ),
        ),
      ),
    );
  }
}
This file defines the stats page where users can view statistics related to notifications.
- Open
main.dartand replace its content with the following code:
import 'package:awesome_notifications/awesome_notifications.dart';
import 'package:flutter/material.dart';
import 'pages/home_page.dart';

void main() async {
  AwesomeNotifications().initialize(
    'resource://drawable/app_icon', // make this an empty string in case it doesn't work
    [
     // notification channel for basic notification
      NotificationChannel(
        key: AppStrings.BASIC_CHANNEL_KEY,
        name: AppStrings.BASIC_CHANNEL_NAME,
        channelDescription: AppStrings.BASIC_CHANNEL_DESCRIPTION,
        defaultColor: AppColor.primaryColor,
        importance: NotificationImportance.High,
        defaultRingtoneType: DefaultRingtoneType.Notification,
      ),

      // notification channel for schedule notification
      NotificationChannel(
        key: AppStrings.SCHEDULE_CHANNEL_KEY,
        name: AppStrings.SCHEDULE_CHANNEL_NAME,
        channelDescription: AppStrings.SCHEDULE_CHANNEL_DESCRIPTION,
        defaultColor: AppColor.primaryColor,
        importance: NotificationImportance.High,
        defaultRingtoneType: DefaultRingtoneType.Notification,
      ),
    ],
  );

  runApp(MyApp());
}

class MyApp extends StatelessWidget {
  static GlobalKey<NavigatorState> navigatorKey = GlobalKey<NavigatorState>();

  @override
  Widget build(BuildContext context) {
    return MaterialApp(
      navigatorKey: navigatorKey,
      title: 'Rockets',
      theme: ThemeData(
        primarySwatch: AppColor.primaryColor,
      ),
      home: const HomePage(),
    );
  }
}
This file initializes Awesome Notifications and sets up the main application.
- Save all files, run the application using the following command:
flutter run
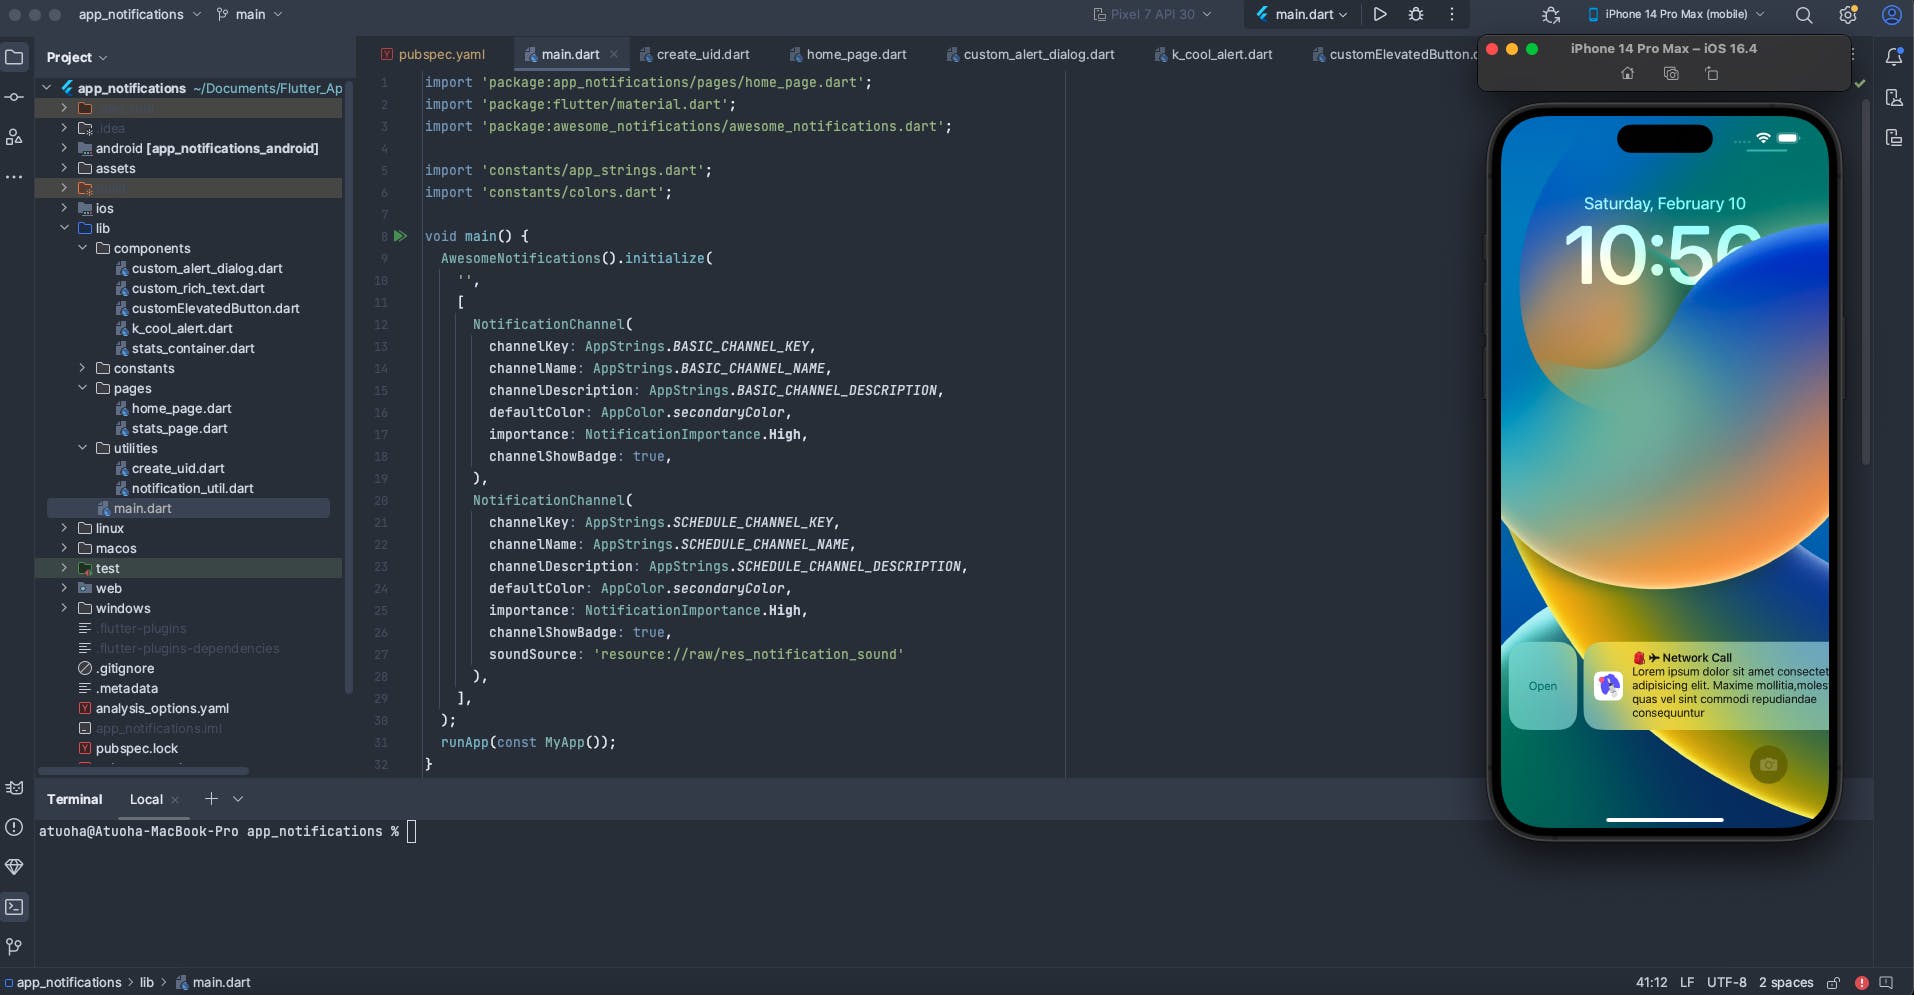
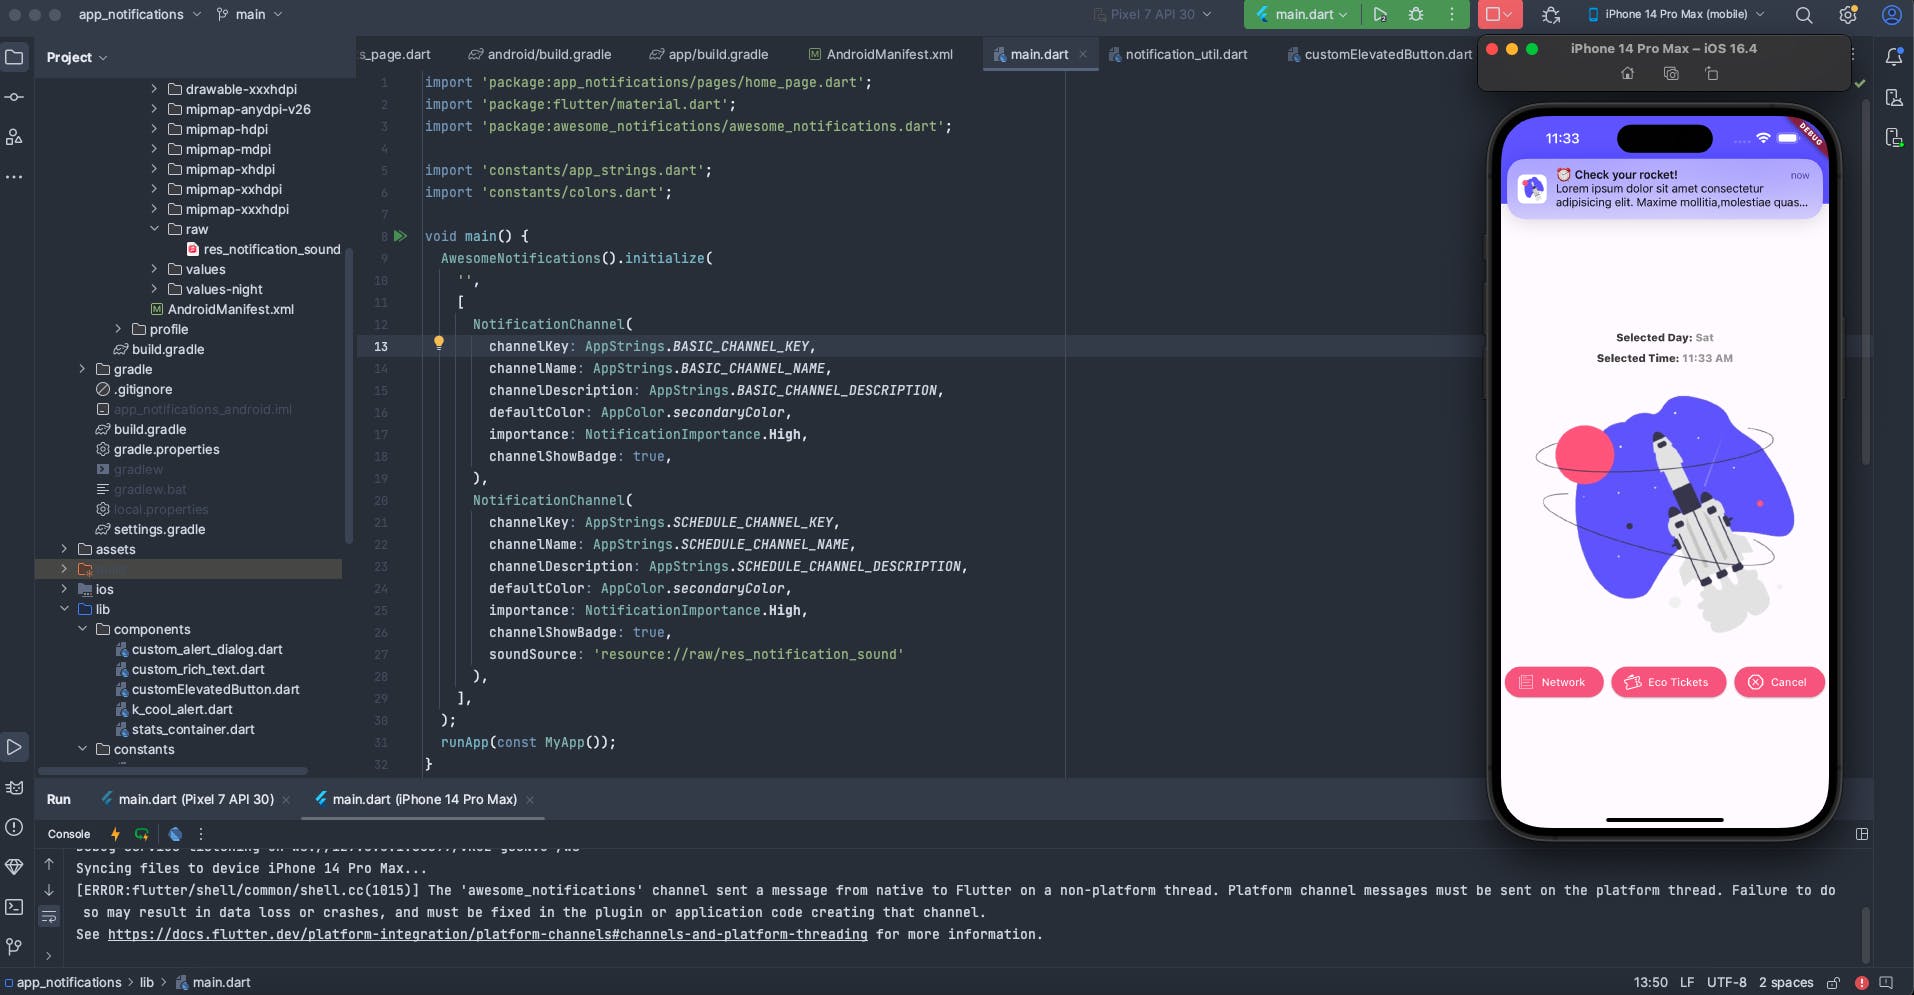
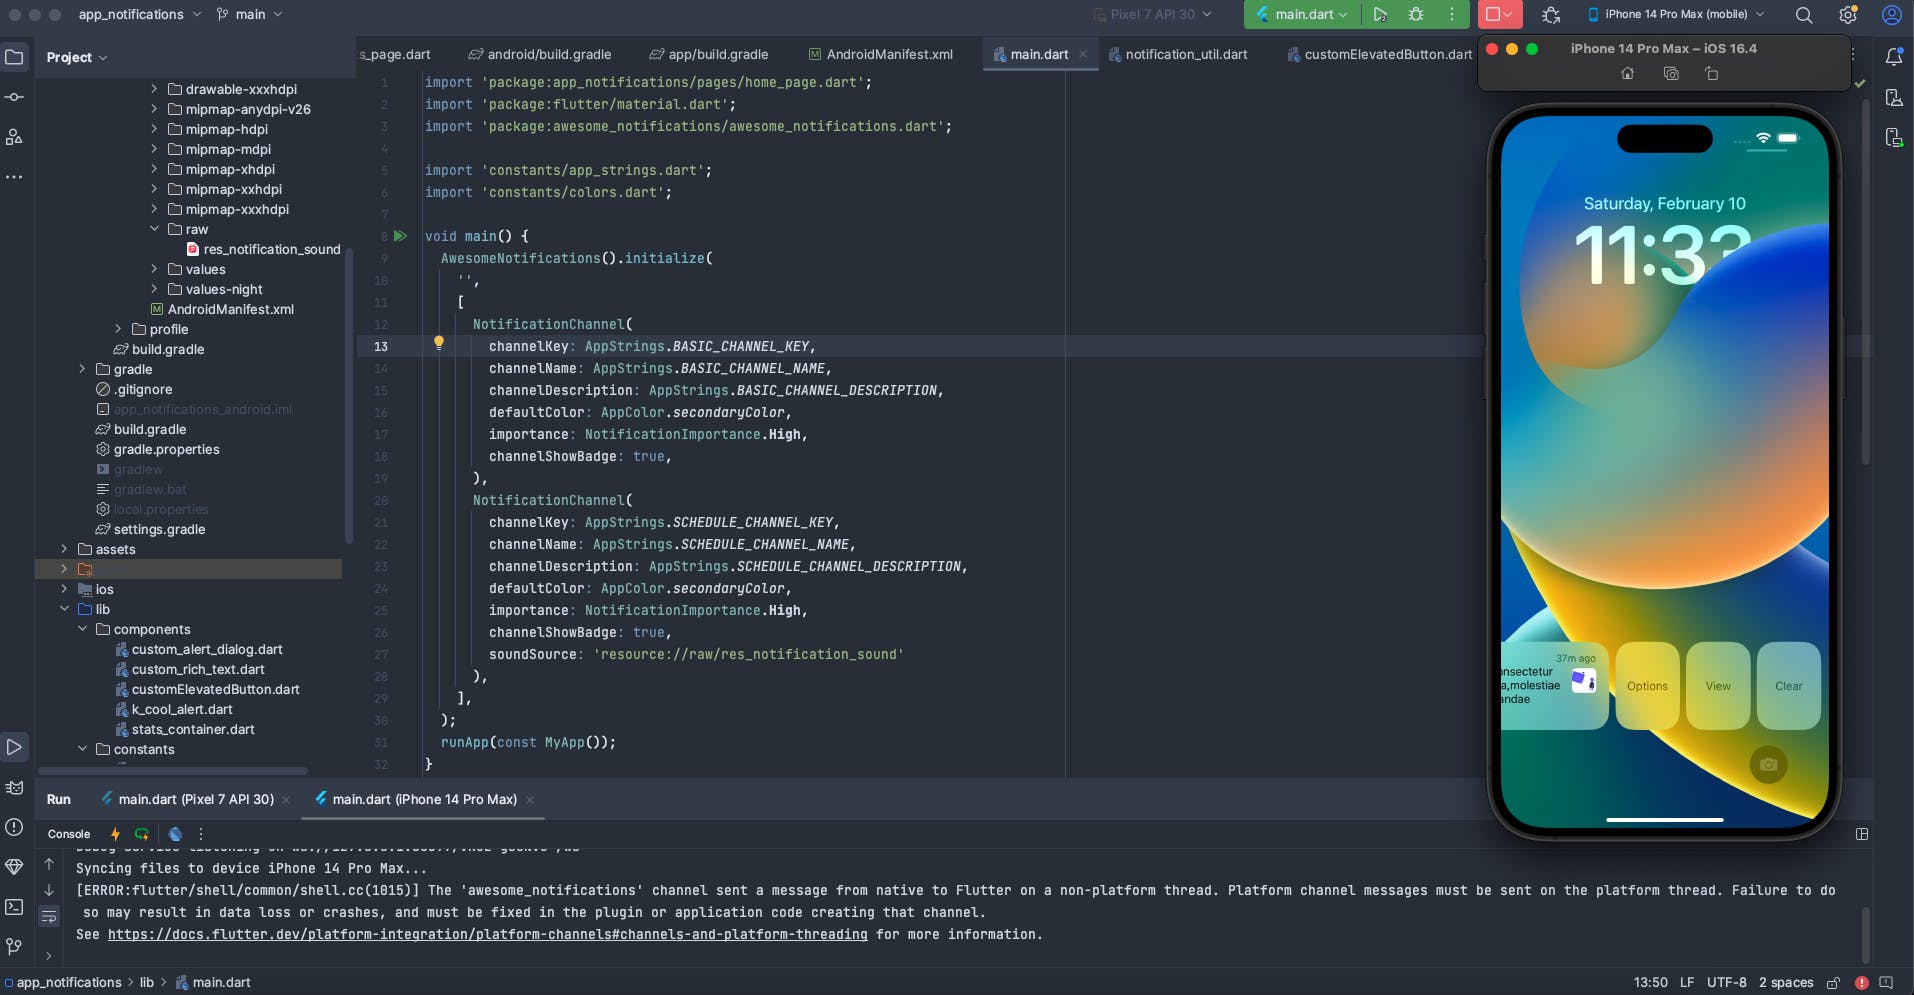
This will launch the application, and you can start triggering basic and scheduled notifications.
Implementing local notifications in a Flutter application is essential for providing users with timely information and reminders. The awesome_notifications package simplifies the process of creating, scheduling, and handling notifications. By following the steps outlined in this article, you can enhance user engagement and provide a better overall experience for your Flutter application users.
Few Screenshots:


To explore more examples and get detailed information about the awesome_notifications package, you can refer to the official documentation and GitHub repository:
Official Documentation:
- awesome_notifications on pub.dev: This is the official package page on pub.dev. You can find documentation, examples, and version history here.
GitHub Repository:
- awesome_notifications on GitHub: Visit the GitHub repository to access the source code, issues, discussions, and more. It's a great resource to explore the inner workings of the package.
Reading through the documentation and checking out the official repository can provide additional insights, usage scenarios, and updates related to the awesome_notifications package. It's always beneficial to refer to the official sources for the latest and most comprehensive information.